NSButton With A Solid Background, Rounded Corners in Swift
Implement a button with a background color, rounded corners, and image padding


This post will implement FlatButton, a subclass of NSButton, with a solid background color, rounded corners, and image padding.
- Override draw(:), Configure Corner Radius
- Add A Solid Background
- Set Image
- Adjust Bounds To Apply Image Padding
- Complete Implementation
Override draw(:), Configure Corner Radius
To implement a custom button, start by overriding the draw(:) function. This method is called whenever the button is drawn.
Flat buttons often have rounded corners and a solid background color. To allow the button to have a background layer, wantsLayer is set to true. Then, the cornerRadius is set on layer to apply rounded corners.
@IBDesignable class FlatButton: NSButton {
    @IBInspectable var cornerRadius: CGFloat = 5

    override func draw(_ dirtyRect: NSRect) {
        // Set corner radius
        self.wantsLayer = true
        self.layer?.cornerRadius = cornerRadius

        // Super
        super.draw(dirtyRect)
    }
}
Add A Solid Background
Next, the backgroundColor property on layer is set to the configured backgroundColor. To make the button interactive, the background color is darkened when isHighlighted is true. This will darken the background color when a user clicks on the button.
@IBInspectable var backgroundColor: NSColor = .blue
    // inside of draw(_ dirtyRect:)

    // Darken background color when highlighted
    if isHighlighted {
        layer?.backgroundColor =  backgroundColor.blended(
            withFraction: 0.2, of: .black
        )?.cgColor
    } else {
        layer?.backgroundColor = backgroundColor.cgColor
    }

    // ...
Set Image
Often flat buttons have an image next to the button text. In this implementation of FlatButton, the icon will be in the imageLeading position (on the left-hand side of the text).
@IBInspectable var imageName: String = "NSActionTemplate"
    // inside of draw(_ dirtyRect:)

    // Set Image
    imagePosition = .imageLeading
    image = NSImage(named: imageName)

    // ...
Adjust Bounds To Apply Image Padding
Finally, padding is applied to ensure the text and image are not touching any edge of the button. This implementation changes bounds for the super.draw(:) call explicitly and uses defer to set bounds back when the function exits.
@IBInspectable var dxPadding: CGFloat = 10
@IBInspectable var dyPadding: CGFloat = 10
    // inside of draw(_ dirtyRect:)

    // Reset the bounds after drawing is complete
    let originalBounds = self.bounds
    defer { self.bounds = originalBounds }

    // Inset bounds by padding
    self.bounds = originalBounds.insetBy(
        dx: dxPadding, dy: dyPadding
    )

    // ...
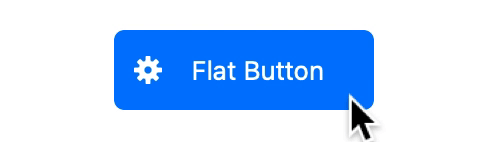
Flat NSButton
That's it! With FlatButton you can implement an NSButton using flat design. The provided implementation of FlatButton results in the following:
Complete Implementation
@IBDesignable class FlatButton: NSButton {
    @IBInspectable var cornerRadius: CGFloat = 5

    @IBInspectable var dxPadding: CGFloat = 10
    @IBInspectable var dyPadding: CGFloat = 10

    @IBInspectable var backgroundColor: NSColor = .blue

    @IBInspectable var imageName: String = "NSActionTemplate"

    override func draw(_ dirtyRect: NSRect) {
        // Set corner radius
        self.wantsLayer = true
        self.layer?.cornerRadius = cornerRadius

        // Darken background color when highlighted
        if isHighlighted {
            layer?.backgroundColor =  backgroundColor.blended(
                withFraction: 0.2, of: .black
            )?.cgColor
        } else {
            layer?.backgroundColor = backgroundColor.cgColor
        }

        // Set Image
        imagePosition = .imageLeading
        image = NSImage(named: imageName)

        // Reset the bounds after drawing is complete
        let originalBounds = self.bounds
        defer { self.bounds = originalBounds }

        // Inset bounds by padding
        self.bounds = originalBounds.insetBy(
            dx: dxPadding, dy: dyPadding
        )

        // Super
        super.draw(dirtyRect)
    }
}